
Plantation Shutter Installs
Half of a shutter’s fit and finish is attributable to the quality of materials, while the other half is tied to the quality of the installation methods used. We pay attention to small details that help set our shutters apart from others.

Dedicated Install Team
We don’t use generic contractors or part-time help for installations. We have a team that is dedicated exclusively to installations - they perform up to 5 installations a day, 5 days a week. Our team has performed over 10,000 installations - which should give you peace-of-mind that we can handle most shutter-related scenarios that can arise. How an installation is performed has a big impact on how your shutters end up looking and functioning.

Clean Installs
We know that it's not just a house, it's your home. That's why we always make sure to leave the space cleaner than we found it --whether during initial measurements, or the final installation. We even wear shoe covers and use our vacuums, because keeping your home clean matters to us. We're careful to keep doors closed behind us to ensure your beloved pets stay safely inside.

Nail-Free Frame Faces
Many shutter installers simply shoot 16-gauge nails through the front face of the shutter frame to attach it to the wall. Unfortunately, this method leaves 3 mm wide holes that need to be patched - which oftentimes does not match the paint color of your frame. To avoid this, we shoot all nails through the inner jamb of the shutter frame, which is the most out-of-sight option. We also fill all nail holes with caulking to help them blend in.
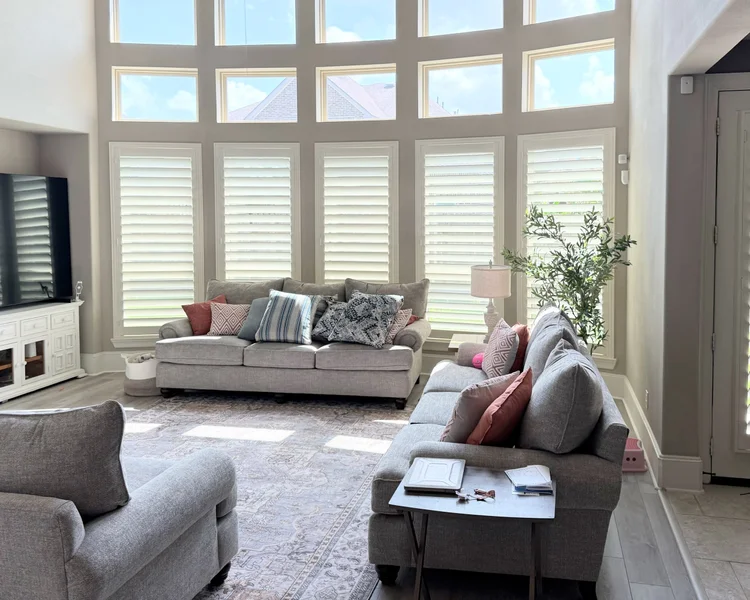
Height Equalization
When you have a set of multiple windows side-by-side, it's rare for the heights of all windows to be the same. A common variance in heights for sets of windows is 1/4" to 3/8", but can even be 1/2" and greater. We examine the sets of multiple windows and equalize the heights of the shutters, which aligns the tops of the shutter frames for symmetry.

Concealed Wall Gaps
Some homes have walls where there is a substantial curvature or warping when comparing the bottom of the wall to the top of the wall. When you place a straight shutter onto a curved wall, a gap will exist between the shutter frame and the wall. If the curvature is great enough, you will see lines of light radiating through the gap. We caulk the gap between your wall and shutter frame in any case that light is visible.

Chair Rail Trimming
Many homes have a decorative "chair rail" in formal dining rooms, as well as breakfast nooks and other rooms. The purpose of chair rail is to stop a chair from dinging or marring the wall. In order for our shutter frames to fit in place, we trim the chair rail so that your shutter frame is nicely nested between the two sections of chair rail.

Flush Tile Backsplashes
We integrate our plantation shutter frames with your tile backsplash so that you get an installation that looks truly custom. No bulky transitions here - we selectively increase the thickness on the back of our frame to be the same thickness as your tile (most commonly 1/4" or 3/8") in targeted areas. This presents a nicely finished frame that integrates with your backsplash.

Kitchen Sink Magnetization
Windows over the kitchen sink are often placed quite closely to the sink faucet. In many cases, if a shutter is hinged, the shutter will contact the faucet when the shutter is opened on its hinges. To avoid this, we magnetize the shutter in four corners so that it can "pop" in and out of place. This allows for easy access when needed for cleaning, while avoiding the obstacle of the faucet.

Customized for Clearances
Some homes have windows that feature a combination of latches and window cranks. In many cases we are able to modify our frames to preserve functionality of these features. We often modify the rear "light strip" portion of our frame to gain extra clearance for cranks and latches. If modification of the frame is not possible, a special "outside-mount" frame may be used to provide proper clearance.
Top Installation FAQs
Every installation question we hear from Houston homeowners — lead times, timeslots, what happens on install day, removing old blinds and shutters, and how we mount and finish each frame, answered by the in-house crew that does the work.
Installation is typically 4–6 weeks after four steps are complete:
- Quote accepted (call, text, or email us)
- Detailed measuring completed (usually within 2–3 business days of acceptance)
- 50% deposit provided (usually the same day as measuring)
- Order confirmation agreement signed (usually within 1 day of measuring)
Measure-yourself online shutters save money up front but commonly fail on three fronts: measurement accuracy, option selection, and installation. We periodically replace failed DIY orders.
- Measurement accuracy. Well-fitting shutters with an inside-mount frame require measuring to 1/16″. We use a professional laser measuring tool; a household tape measure makes that precision hard.
- Options overload. Online configurators offer dozens of choices with no expert guidance — pick the wrong frame type and the shutters may not fit or the louvers may not clear your window.
- Installation. There’s a difference between a shutter fitting a window and functioning in it. Window sills are almost never level, so proper shimming and adjustment is needed for panels to swing open/close freely and to achieve alignment and symmetry of the frames in groupings of shutters.
If you do go this route, study the options carefully and take your time measuring and installing. Outside-mount frames are normally the most forgiving, making both measuring and installation easier.
Yes — every installation is performed by HTX Shutters’ dedicated in-house team. No generic contractors. Our two installation specialists handle each job, and the crew has completed more than 9,000 installations. We consider installation quality just as important as build quality.
An organized, respectful crew and a clear handoff. Here’s our process:
- We arrive within your designated timeslot (we reach out immediately if a prior job runs long — we perform 3 to 5 installs a day, which can occasionally have scheduling impacts).
- Every crew member wears shoe covers to protect your home.
- We do a quick walkthrough, then stage each shutter at its window.
- One installer mounts shutters while the others handle finishing: caulking between frame and sill, concealing every nail hole, and vacuuming each window area
- We finish with a walkthrough to demonstrate operation and confirm everything looks right — final payment is due at completion.
About 1 hour for 1–6 windows, 1.5 hours for 7–12 windows, 2 - 2.5 hours for 13-18 windows and 2.5 – 3.5 hours for 19+ windows. Add 30–60 minutes if your order includes inside-mount L-frames.
We offer four timeslots: 9:00–9:30 am, 11 am–2 pm, 12–3 pm, and 1–4 pm. We propose your slot about 7–10 days beforehand. We have 4–5 installs grouped by installation location per day, so we can’t guarantee specific picks, but if the proposed slot doesn’t work we’ll offer an alternative — usually the following week or two.
No — 1 shutter or 50, the timeline is the same. Our sequential manufacturing queue has enough capacity to handle any order size without compromising delivery speed.
We expedite a replacement. Every shutter is custom-built to tight tolerances, and a non-fit occurs on roughly 1–5% of installations. Sometimes the frame can be adjusted on-site; if not, a re-manufactured shutter is typically back on your window within 5–10 business days.
Windows first. About half of window companies install from inside the home — which existing shutters can block — so ordering windows first keeps every option open. Our outside-mount frames may be compatible with inside-installers; confirm with your window company.
We don't normally handle any shutter removal and reinstallation — since a contractor or handyman is usually more cost-effective than our services. Sometimes our installers will freelance work on the weekend, depending on their availability: usually around $225 per trip plus $85+ per shutter (depending on size) removed or installed, with a $500 minimum per trip (removal and reinstallation are separate trips). We are happy to consult with your contractor and provide information and guidance. You can start by giving your contractor these guidelines:
Removal:
- Pull the hinge pins (bullnose or end-cutting pliers) and lift each panel out
- Cut the caulk line between frame bottom and sill
- Cut any caulk lines on the frame sides and top
- Locate the caulked nail holes inside the jamb (slide a pencil or flat object between frame and drywall to find nails)
- From the rear, cut the nails with an oscillating multi-tool (metal-cutting blade) — non-hinged side first, then hinged side, supporting the frame on the final cuts
- Remove the frame, note the position of any sill shims, and flush-cut the nail remainders
Reinstallation:
- Return shims to their original sill positions and set the frame in the opening
- Drive 3-1/8″ T10 trim-head screws at the top and bottom of the hinge side (screws beat nails for re-installs)
- Re-hang the panel via the hinge pins and check the swing — if the panel contacts the top, tighten the bottom screw or back off the top screw (and vice versa)
- Add screws to the middle of the hinge side, then the non-hinged sides, top, and bottom
- Caulk the bottom between frame and sill, plus the sides if needed
Yes — existing blinds or rollers must come down before installation. Remove them yourself, or we’ll remove and dispose of them for a small fee of $9 per window. You will need to remove your blinds if the curtain rod hardware is within 2" of any edge of the window opening.
Five steps, about two minutes per window:
- Raise the blinds fully
- If you have a top wood valence cover, lift off the valance at the top front — it sits on plastic clips
- Pry up the small metal flap on the front of the top-left and top-right brackets
- Pull the upper metal rectangular section forward, free it from the hardware, and remove the blind
- Unscrew the remaining brackets — two screws per side, Phillips or 1/4″ hex, easiest with a power drill
Yes — removal and disposal typically runs $75+ per window. Three common risks with old-shutter removal: extracting nails and screws can crumble or crack sheetrock, adhered caulk can pull wall paint, and the new shutters may not cover the previous footprint exactly, leaving spots that need drywall patching and touch-up paint. We do not perform any patch/paint services, but we try to minimize damage when we remove your old shutters.
Usually one of the two holes on each side gets covered by our frames. The remaining hole is only visible when the panel is open and you look up (or from outside at close range), and can be patched and painted after installation.
No. Face-nailing is a shortcut many manufacturers use, and it leaves visible filled holes every ~24″ across the front of your frames. We instead nail through the jamb — the interior surface of the window opening, perpendicular to the wall — and caulk every hole, so the frame face stays clean even with the panels open.
The flat 3/4″ face lines up about 1/8″ behind the front of your window trim’s reveal, which makes for a cleaner caulk line. On windows with shallow depth, the L-frame is partially inset into the trim, with its front half proud of the existing trim.
Photos: standard L-frame positionPhotos: partial-inset L-frame
No weekend installations — but we do offer in-home consultations and detailed measuring sessions on Saturdays and Sundays.
We normally install an order in a single trip — it keeps labor costs (and therefore prices) down. For very large orders of 40+ windows, we’ll evaluate an early partial delivery case-by-case.
We avoid it, for three reasons. Drywall openings are rarely square, so a square shutter shows uneven light gaps all around; without an internal frame there’s little flexibility to level the panel for smooth operation; and magnets — with their strong pull — stress bare drywall. Our frames solve all three, for a better looking and better functioning shutter.
You absolutely can — we started exactly that way 9 years ago, in a garage with a handful of power tools. But seasoned woodworkers regularly tell us shutters are among the hardest projects they’ve attempted. If you try it, you’ll want: a compound miter saw, table saw, bandsaw, high-quality 90+ tooth blades (we prefer Forrest), a joinery system (we prefer Festool Domino), a jointer, a planer, a drill press, and an HVLP spray system.
No — we only install shutters built by HTX Shutters. Even with a proper install, we can’t guarantee the fit and finish of another company’s product.
Our preferred method is a built-out spacer on the back of the frame that wraps the tile cleanly — 3/8″ tile gets 3/8″ of added frame depth for a polished look. For very thick tile (0.75″+), we notch the lower frame legs around it instead.
With magnets and faux hinges. When a faucet would interfere with the swing of a sink-window shutter, we magnetize the panel at all four corners so it lifts in and out for cleaning instead of swinging. Faucets with removable heads make this even easier.
Primarily residential — most commonly 2,500–4,500 sq ft Houston homes — but we’ve worked on everything from manufactured homes to penthouse suites, and occasionally unique projects like the Consulate of Spain or large senior-care facilities.
Absolutely — many customers do two rounds, some three, and we’ve had customers do four. Each round carries our standard $299 delivery and installation fee, which covers transport and install time for that trip.
Casing depth sets your louver options. Most newer Houston homes have deep casings that accept 2.5″, 3.5″, or 4.5″ louvers. Many homes in the Heights, West University, and Bellaire have shallower casings that limit you to 2.5″ or 3.5″.
15-gauge finishing nails, shot through the inner jamb of the frame — placed toward each corner and every 18–24″ along each side, then filled with caulk so they disappear.
Substantially bowed walls can leave a gap between the wall and the shutter frame. We caulk wherever light leaks through, which finishes best on smooth, light-colored walls. On dark, heavily textured walls, a caulk line can look worse than the gap itself, so we may leave it uncaulked.
Have a different question? Browse all 111 plantation shutter answers.
Curious about what we offer?
See the how we set the standard for service.