Top 6 Shutter Styling Mistakes And How To Avoid Them

UPDATED: February 2026
Plantation shutters have been around for hundreds of years, which means that there have been plenty of variations in styling options over that time. From louver sizes and color, to tilt rods, paint sheens, and more, it’s easy to become overwhelmed by the sheer volume of styling combinations that are at your disposal when considering plantation shutters for your Houston home.
Naturally you want wooden shutters that match both your existing home decor as well as your own personal taste. But since most people don’t buy shutters on a regular basis, it’s easy to overlook some of the most important styling considerations.
This article will cover the most common plantation shutter styling mistakes that we encounter around Houston.
A quick disclaimer: These suggestions are meant as a simple guideline for following basic interior design and window styling principles. What’s important is that you end up with interior shutters that match your personal taste. At the end of the day, you’re the one who gets to enjoy the shutters--so make them something that you’ll love!
Shutter Styling Mistake #1: Mismatching Louver Size And Tilt Rod Style To Your Current Home Decor
One of the first considerations when exploring plantation shutters is also one of the most straightforward. Simply put, it’s a lot easier to style new plantation shutters to match your current home decor than it is to change your home’s decor to match the new plantation shutters. Two primary ways to style shutters to match your existing decor is with tilt rod style and louver width.
1) Tilt Rods:
Let’s talk about tilt rods first. There are two options for plantation shutter tilt rods: front-tilt, and hidden-tilt. Yes, it’s exactly what they sound like. Front-tilt rods are visible on the front of the shutter, while hidden-tilt rods are attached on the rear side of the shutter panel and remain out-of-sight. One downside to front-tilt rods is that the staples connecting the front bar to the louvers have the tendency to pull-out and require maintenance. At HTX Shutters, we use primarily aluminum hidden-tilt rods on most of our shutters, as they are maintenance-free and most customers prefer the functionality and aesthetic. We typically build shutters with the front-tilt rod if specially requested by a customer.

Front-tilt is a great style choice for these home styles:
Colonial & Historical Recreation
Traditional
Craftsman
Hidden-tilt is a great style choice for these home styles:
Traditional
Craftsman
Transitional
Minimalist & Contemporary
Modern & Mid-Modern
Urban
French Country & Farmhouse
2) Louver Width:
Louvers are the slats that rotate to allow you to change the view and privacy of the plantation shutter. The common widths are 2.5”, 3.5” and 4.5”. The advantage of the larger (4.5”) louvers is that the shutter has fewer slats, and thus fewer horizontal lines disrupting your view when the shutter is open. A shutter with 2.5” louvers will have twice the number of slats than a shutter with 4.5” louvers. This means the view for the 2.5” shutter will have twice the number of slats impeding your view. At HTX Shutters, we use primarily use 3.5” and 4.5” louvers, since they provide the best views, while also blending into a full range of home styles, from classic to modern. We do, by special request, build shutters with 2.5” louvers. In general, larger louver sizes are considered more contemporary, which smaller louver sizes are considered more traditional. The two main factors you should consider when choosing louver width are window heights and home style.

2.5” Louvers

3.5” Louvers

4.5” Louvers
3.5” louvers are a great style choice for:
Window heights from 20” to 70”
Home styles with classic roots
4.5” louvers are a great style choice for:
Window heights from 36” to 95”+
Home styles with modern touches
Since small windows inherently have limited visibility to begin with, using larger louvers helps you avoid worsening the already limited visibility. When in doubt, it’s generally safer to use larger louver sizes since they work on most window sizes and can complement contemporary decor or refresh traditional decor. Our clients are generally happier when they select larger louver sizes, very rarely does anyone wish they had gone smaller.
Shutter Styling Mistake #2: Choosing A Frame Style That Clashes With An Existing Sill, Baseboard or Crown Molding

Good example of matching plantation shutter frame, window sill and baseboard (all flat, minimal detail)
For homes with an existing wooden sill and drywall on the left/top/right sides, plantation shutters will sit within a frame. We offer six different frame profiles to complement different window sill designs, as well as surrounding baseboard or crown molding. One important styling cue is to ensure that the styling of the frame does not clash with existing design elements, primarily the sill pattern. Many designers agree that a frame should not clash or compete with surrounding design of sills, baseboard or crown molding. For this reason, our frame options are stylized to work well in most homes and complement existing decor. As with most decor, continuing the use of the same frame throughout the home provides a consistent ambience. Nothing detracts from your home’s overall design aesthetic than inconsistency, and that includes plantation shutters in Houston homes.
Shutter Styling Mistake #3: Not Matching Shutter Paint To The Existing Frame’s Paint
Yes we realize how obvious it sounds, but you’d be surprised how often we encounter this! Mix-and-matching paint looks a lot like someone wearing a clashing outfit: It sticks out (and not in the good way). We are big believers that matching your shutter’s paint with the window sill or surrounding trim is the best way for your shutters to blend into your existing decor. Most window manufacturers do not include free custom paint and charge extra for it. Here at HTX Shutters, we include custom paint for free with every order, which includes a single light (whites, light beiges, light greys) Sherwin-Williams custom color. In the case of “polywood” or “poly” shuttters from other providers, you are typically restricted to only three colors, which doesn’t give you a high chance of matching to your existing decor.

We are believers that “lighter is brighter” when it comes to paint. If you are deciding between two different shades, erring on the light side provides the benefit of lightening the room (instead of darkening). Our favorite paint colors are “High Reflective White” SW7757 and “Extra White” SW7006. These are our typical recommendation because they are clean, bright, cool whites that are refreshing. Keep in mind, cool colored whites do not work for all decors, so sometimes a warmer white is needed. Other favorites of our customers include “Snowbound” SW7004, “Pure White” SW7005, and “Alabaster” SW7008.
Shutter Styling Mistake #5: Choosing Outside-Mount Frames Without Considering Inside-Mount Frames

As a general rule of thumb, it is more aesthetically pleasing to mount wooden plantation shutters inside the existing window casing where functionally possible. This allows the shutter to sit flush with the front edge of the frame or window casing, whereas an outside-mount results in a shutter that sticks out from the wall by 1.5” to 2”. The primary difference between inside-mount and outside-mount is how much the shutter sticks out into the room. Many shutter installers will use bulky out-side mounts because they are the cheaper and easier way to build and install plantation shutters. At HTX Shutters, we pride ourselves on using inside-mount applications wherever possible. With that being said, our outside-mount solutions are sleeker and better looking than our competitor’s as they include a bottom sill-cap that hides your existing sill and makes the shutter look more integrated.
The exception to the rule of using inside-mounts is if you need additional depth for clearance with larger louvers, such as mounting plantation shutters onto a glass patio door or French door. In such a case you would use a L-frame to move the shutter panel slightly away from the door’s glass, which in turn grants the full range of open/close motion for the louvers. Another exception is if you want to retain use of tilt-in window functionality or be able to remove window screens. Tilt-in windows allow easy access for cleaning window panes (especially on the 2nd floor), however they often interfere with traditional shutter frames. In these cases, an outside-mount allows the tilt-in window functionality to be retained. Many of our customers with tilt-in windows still choose inside-mount frames, as they don’t plan to use the tilt-in functionality for their cleaning needs.
Shutter Styling Mistake #5: Going Frame-Less When Your Window Has No Sill Or Existing Frame
Another important styling option to consider for interior plantation shutters is whether or not your existing window casing has an existing frame or bottom sill. For the sake of simplicity, there are 3 main scenarios that you may encounter when evaluating your windows. Scenario C is the most common variation that we encounter, followed by Scenario A.

Scenario A: Existing 4-Sided Frame

Scenario B: Frame-less Window

Scenario C: Window With Bottom Sill Only
Scenario A: Your window has an existing 4-sided frame (wood trim on 4-sides)
If the window does have a full four-sided frame, then there is no need to incorporate any large frame to your plantation shutter styling. At HTX Shutters, we use a flat, plain 3/4” wide frame to internally mount our shutters into your existing window frame. Attempting to add a larger frame on top of existing framework is not only unnecessary, but it also distracts from the shutter’s refined aesthetic. You’re better off leaving this one alone and keeping your new wooden shutters within just our slim frame.
Scenario B: The window is frame-less
If the window does not have a pre-existing frame, then you’ll want to consider including a 4-sided frame with your plantation shutters. We’ll dive more into the different types of frames in a separate post. Simply put, installing a frameless shutter panel into a frameless window casing tends to look a bit unfinished and can doesn’t look as polished. It results in larger, uneven caulking gaps that are unavoidable. Whereas adding a 4-sided frame around the shutter panel makes the plantation shutters look more purpose-built for your specific home, and it also conceals any jagged, uneven edges of your existing drywall.
Scenario C: The window has a bottom sill
This is the most common scenario. If the window does not have a pre-existing frame, but does have a bottom sill, then you’ll want to consider including a 3-sided frame with your plantation shutters. The 3-sided frame conceals the left, top and right sides of drywall, which are often uneven and wavy. You are presented with a finished frame that conceals any roughness and looks custom-built for your home!
Shutter Styling Mistake #6: Using A Three-Sided Frame That’s Wider Than The Window’s Bottom Sill
If you find yourself incorporating a three-sided frame, make sure that it’s built to the correct width. More specifically, you should avoid having the left and right sides of the plantation shutter frame extend further than the bottom sill.
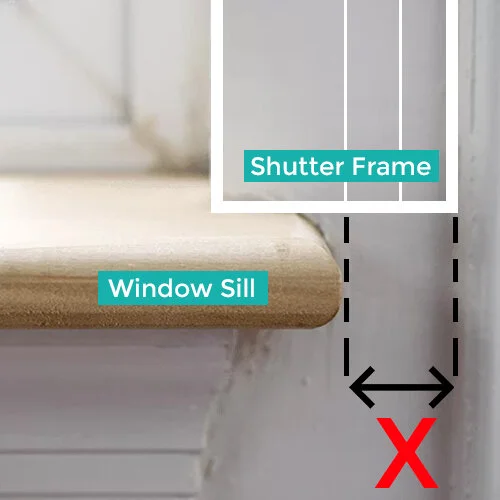
The shutter frame should rest flush with the right and left sides of your window sill.

Good example of plantation shutter frame sitting inside of sill-plate. No overhang or issues here.
By having the side frames extend further than the window’s bottom sill, an overhang is created that may be noticeable or out-of-place. This isn’t as important if the overhang is small, e.g., less than 1/2” on each side, but larger overhangs have a more drastic impact. Such mismatched dimensions detract from the more elegant look and overall aesthetic that typically accompany plantation shutters. While not always avoidable if the sill-plate is a non-standard width; at HTX Shutters we try to correct and account for overhangs as much as possible when sizing your shutter frame and panels.
There are plenty of other elements to consider when styling plantation shutters for your Houston home, but these are some of the most common mistakes that we encounter as professionals.
Want some assistance styling plantation shutters for your home?
Schedule a free in-home consultation today or get an easy quote online.